Textures added:
- for locomotives series EP05, including:
EP05-23'21, EP05-23'24;
- for locomotives series EP07, including:
EP07-387'22;
- for locomotives series EU07, including:
EU07-220, EU07-303'24, EU07-465'22;
- for locomotives series EP09, including:
EP09-012'06;
- for locomotives series ET22, including:
ET22-641, ET22-959, ET22-980, ET22-985, ET22-1008'24;
- for locomotives series EU44, including:
EU44-007'24, EU44-005'24, EU44-006'24;
- for locomotives series E6ACTab, including:
E6ACTab-058;
- for locomotives series ES64F4, including:
ES64F4-203'23, ES64F4-805'24, ES64F4-846'12;
- for locomotives series M62, including:
M62-1151, M62-1242, M62-1292, M62-1684;
- for locomotives series ST44, including:
ST44-313'14, ST44-R008, ST44-1201;
- for locomotives series SU45, including:
SU45-045'07, SU45-089, SU45-187;
- for locomotives series TEM2, including:
TEM2-219'11, TEM2-266;
- for locomotives series 181, including:
181-115'14;
- for wagons series Sgs, including:
607-5, 464-1;
- for wagons series Eaos, including:
710-8, 224-1, 852-9, 598-5, 736-6;
The latest release also includes a number of fixes to individual models, scenery, and scenarios that have been discovered since the previous release.
Warnings for users of computer games
A small fraction of people can experience epileptic attacks because of the observed visual effects, such as blinking lights or multicolour compositions durning the observation of the computer screen. Even people without such symptomps can have undiagnosed diseases that cause epileptic attacks.
Attacks can occur in a variety of different ways: vision disorders/problems, headaches, muscle and/or eye lid twitching, uncontrolled motion of leg and arm muscle.More serious problems that can occur, are: desorientation, loss of balance, headaches, unaware movements, reddening of the eyes, eye tears, tiredness of eyes. There is a risk of a fall and serious injury can occur. The biggest risks affect mainly children and teenagers, and as such, parents should observe the children whilst they play on the computer.
Recommendations: Always play in well lit room, make a 15min pause, for every 60min spent in front of the computer and rest untill the discomfort disappears, don't sit too close to the screen, don't play if you're experiencing feelings of discomfort or tiredness. If you or your family have a history of epileptic attacks, please consult a doctor before playing.
The software and hardware requirements hare been increased in comparison to the previous versions. Because of the EXE file being supplied in both 32bit (x86) and 64bit (x64), caution should be exercised when picking and running the EXE file and it's dependencies on your computer.
Minimal hardware requirements:
- Processor: Core 2 Duo E4700 2.6GHz, AMD equivalent - AMD APU A4-6300 Dual-Core
- Graphics card: AMD Radeon R7 250 or NVIDIA GeForce GT 740 v3 - with minimum of 2 GB VRAM GDDR5 of graphics memory
- RAM memory: 8 GB
- 75 GB of free disk space, in case of a HDD with 7200rpm
- Sound card compatible with OpenAL, and stereo sound.
- Optionally, COM ports, if making your own cab controls.
- Requirements for 32bit (x86) systems, MIGHT be a tiny bit lower.
Recommended hardware requirements:
- Processor: Intel Core i5-7600 lub AMD Ryzen 5 1600
- Graphics card: NVIDIA GeForce GTX 970 or AMD Radeon R9 390
- RAM memory: 16 GB RAM DDR4
- 75 GB of free SSD disk space
- Sound card compatible with OpenAL, and stereo sound.
- Optionally, COM ports, if making your own cab controls.
Additionally, to the hardware requirements, you need to have the following software:
- Graphics card and driver supporting OpenGL 3.3 (for the default renderer) or 3.0 (for the "legacy" renderer).
- For native Linux: you have to compile your own binary, from this GitHub repo. Is is a very outdated version!
- For Windows (& Wine on Linux): Visual C++ Redistributable 2008, 2015 and 2017 packages.
Sometimes. it might be necessary to install the basic Python 2.7.14 package, especailly on 64 bit systems.
It is recommended to have at least 4GB of RAM and a multithreaded CPU. Low amount of RAM might not support bigger sceneries without decreasing the texture size (possible to set in the Graphics tab in the Starter app, or by maxtexturesize in the eu07.ini file), and no free thread on the CPU might result in drastically decreased performance in the vehicles with an onboard computer - then you will have to moddify the "pyscreenrendererpriority" paramter value in the eu07.ini file, from "normal" to "lower" or "lowest").
The new renderer (supporting GL3.3+, with loads of new graphical features) has been implemented into the main binary, and as such, you will have to test if the new render works well on your PC - if it does not, select the rendering mode appropriately - you can set it in the Graphics tab in the Starter app, or in the eu07.ini file, by replacing the entry "gfxrenderer full" with "gfxrenderer legacy", for medium computers, be "gfxrenderer simple" for the weak.
The installation process and the appearance of each windows may vary depending on the user's hardware and software configuration.
- Run the installer of the program by using the file downloaded from the official website of the simulator: MaSzynaXXXX.exe, where XXXX is the number of the simulator release that you have downloaded.
- In the installer window that appears, set the program installation folder by entering the path of the destination folder or selecting it from the directory tree by clicking Przeglądaj / Browse.
Important NoticeIt is not recommended to install the program into system folders where
X is the letter of the system drive:
- X:\ProgramData
- X:\Program Files
- X:\Program Files\Common Files
- X:\Program Files (x86)
- X:\Program Files (x86)\Common Files
- X:\Windows
That could cause numerous errors with access to folders and in extreme cases it will prevent the program from being properly installed.
- After selecting the destination folder, click Dalej / Next.
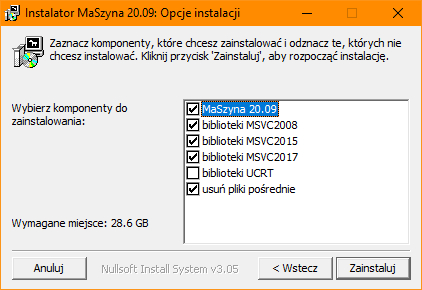
- In the next window that appears, please select the components that you want to install with the program. In most cases, you should choose the options selected by default. On the other hands you should install UCRT libraries, if you do not have them in your system.
- Confirm the choice by clicking Zainstaluj / Install.
- In the case of operating systems with an active Firewall, an alert window regarding the aria2c.exe application features may appear during installation. To allow further installation, click Zezwalaj na dostęp / Allow.
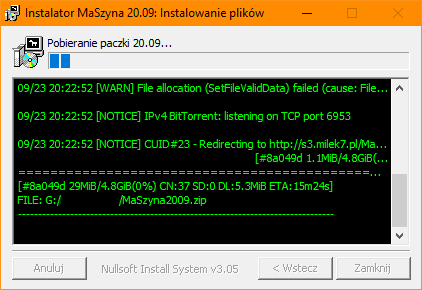
- Installation of the program should begin. Depending on the speed of the Internet connection and the parameters of the disk on which the program is installing, the installation time may vary.
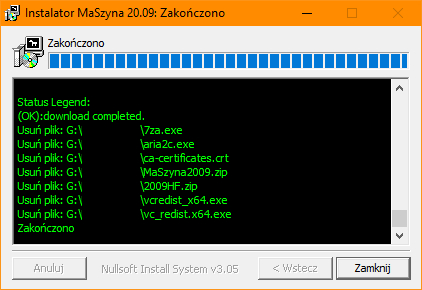
- When the installation is completed, click Zamknij / Close.
- We are ready for the first launch of the MaSzyna Simulator.
To turn MaSzyna on, we need to run the Starter.exe file, located in the main MaSzyna folder.
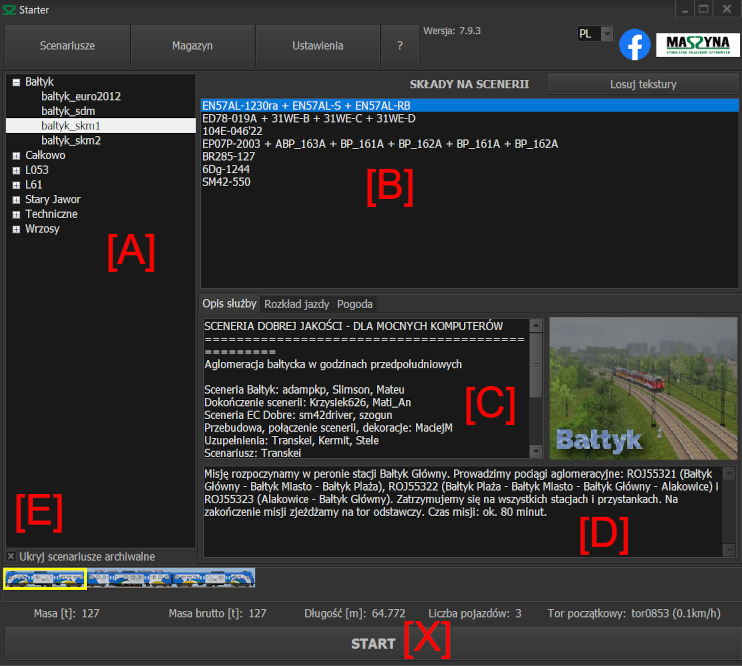
After activating the Starter, we'll see the window - at it's top pane four buttons: Scenarios, Depot, Settings and "?".
To change the Starter into English, go to "Ustawienia" pane, then in the "Ogólne" subpane, and change the "Język: [PL]" into "EN".
The Depot button allows for changing of trains on the scenarios, and will be described further on in the documentation, the Settings allow for changing of the simulation's settings, whilst ? opens the menu of your choice: can be opened readme file (the one you're currently reading) in a new browser window, or the current train instructions - we recommend that you read them before starting the game.
After initialising, a list of sceneries - "maps" - will be shown (point [A] on the pictures). After clicking the "+" by the desired scenery, a list of available scenarios - "missions" - for the selected scenery is shown. "baltyk_skm1" is selected in the picture.
In the [B] window, is a list of available vehicles for that scenario. After choosing one, say EN57AL-1230...
Window [D] will display the duty description, for the selected vehicle. No description might, but not necessarly will indicate that the selected train is for the AI (driven by the computer) only.
Window [C] shows general info about the scenario, and in the other panes the timetable (for the selected train in [B]), attachments like written orders and at the very end weather settings.
The button marked with [E] is used to hide archival scenarios, useful mainly for people with weaker devices – they are distinguished by weak decorations, low use of 3d decorative objects or low complexity of terrain and track layouts - otherwise it is recommended to play on scenarios marked as sceneria dobrej jakości - for mocnych komputerów or sceneria średniej jakości.
In case of the Cloudiness slider, the first (left) half is responsible for cloudiness, and the other (right) for precipitation.
When you're ready to start the simulation, press Start, in the [X] field.
Next, a window will appear, with the simulation's loading bar. Windows can indicate that the program is hanged/not-responding, but that is not the case. Most of the sceneries are detailed, and as such will result in very slow loading times on slow computers.
To uninstall, please delete the main Simulator folder, along with all of it's contents from the computer's drives. Sometimes, you might also need to delete it from the Bin folder. Please use the Empty Bin function.
Important notice
The key presented in this chapter has a default assignment.
Using the Starter.exe it is possible to change the keys at your own idea.
Go to the site containing Keyboard Contols.
The MaSzyna simulator is opening up to new players outside of Poland. By launching the project on Crowdin, you have the opportunity to help us translate our simulator.
Project here: tutaj
The procedure for starting each vehicle is the same - only the control keys change!
Important notice
The key presented in this chapter has a default assignment.
Using the Starter.exe it is possible to change the keys at your own idea.
Go to the site containing the driving and start up procedures.
You can use individual elements of cabin using mouse cursor. To activate/deactivate this function, click Alt on keyboard.
In order to move to the other cab, press either:
- End - move towards cab B (cab A, is normally the one in which the simulation began).
- Home - move towards cab A (in case of being in cab B).
ATTENTION!
In between the cabs, is the Engine Room (in some locos, it looks like a green room). If you are in the Engine Room, then press either Home or End (depending on the direction in which you plan on going) for a second time. When changing cabs in Electric Multiple Units (EMUs) and locos that have more than one unit, you will need to press End or Home a couple of times (for example, in EN57 we press End twice, to move from Ra (Driving Trailer A) unit, to unit S (Motor Coach), and then End three times, in order to move to Rb (Driving Trailer B) unit, and then finally press End twice, to enter the cab). Changing cabs means that the Sim need to load it's model, that's why after pressing Home or End it is necessary to wait (for it to load).
ATTENTION!
If we are driving a vehicle in Multiple Working, or it is a double-unit loco, or a EMU, it is important to check if both the Independant and the Loco brake is in the Running position ("brake off"). We also should set the Train Brake to Cut-off position (Ctrl + Num 5).
COUPLING UP A LOCO TO THE CARRIAGES:
- Drive up to the train (don't leave the cab), when you feel that you buffered up (Drove up to the buffers, and slightly hit them), move the throttle up 2-3 positions, and brake using the Independant Brake (reminder: Num 1).
WARNING!: If, when buffering up, the carriages "run away", then leave the cab, F4 fly up to two, three carriages and brake them using the Handbrakes, holding Ctrl + Num 1. When you are done with the whole coupling-up precedure, fly up to those same carriages, and hold Ctrl + Num 7 in order to release the handbrakes.
- Exit the cab - F4.
- Get as close to the coupler as possible - imagine you are coupling them up yourself. It's not enough to come close vertically, you also need to move horizontally. In majority of cases, you should also lower you self a little bit by using PageDown.
- Press Insert twice - you will hear the characteristic air leak sound and a model of a coupled-up screw-link coupler will be shown, along with the "red hose".
If you, additionally, want to connect the Main Reservoir Pipe ("Yellow hose") then press Insert once more.
WARNING: Sometimes, the coupler and the hoses won't move, it doesn't mean that the loco has not connected up to the carriages.
- Go back to the cab - F4.
- Unbrake the loco - Num 7 and go to the other cab.
UNCOUPLING A LOCO FROM THE CARRIAGES:
- Brake the whole train, pressing the Num 3 for around one second, from the Running position.
- Unbrake the loco only - Num 6.
- Move the Reverser backwards by 2 positions (2 x r) and select the 2nd or 3rd position on the Power Controller, to buffer up to the carriages, and brake using Independant brake (rem.: Num 1).
- Exit the cab - F4.
- Get as close to the coupling as possible - imagine you are uncoupling them yourself. It's not enough to come close vertically, you also need to move horizontally. In majority of cases, you should also lower you self a little bit by using PageDown.
- Press Delete once - you will hear the characteristic air leak sound.
- Go back to the cab - F4.
- Unbrake the loco - Num 7.
COUPLING UP TO A TRAIN THAT ALREADY HAS A LOCO:
To couple up to a train on the same track, drive up to it gently. After you buffer up, brake using the Independant brake. In order to prevent a runaway train, it is vital that you perform a Full Service brake application or at least a Service brake application (Num 8).
ATTENTION!
If your train is to be coupled up to a train driven by AI, (ie. you drive a Banking Engine or the AI hauls your train ), then it is absolutely necessary to set the Train Brake to the Cut-Off position (Ctrl + Num 5)!
If the user is to drive the train, then the Train Brake valve must stay in the braking positions, and the Reverser must be in either the forward or backward position. This deactivates the AI !!.
After the above has been completed, one can now start to couple the couplers with Insert. The moment the coupler is connected (after the first Insert key press ) AI "being" in the set is either deactivated (Train brake in the braking positions) or it's activated (Train brake in the Cut-Off position). If you make a mistake (choose wrong action), then decouple, set the Train brake in the correct position, and try to couple up again.
COUPLING A LOCOMOTIVE TO A UNIT (WITH THE USE OF A COUPLING ADAPTER):
- Drive up to the train but stop between 25 m and 5 m from it.
- Get out of the cab and move to the coupler facing the unit we will couple up to.
- Put on the coupling adapter - Ctrl + Insert
- Drive up slowly, and push up gently and slowly against the coupler on the unit.
- Check if the couplers locked together - try to drive away from the unit.
UNCOUPLING A LOCOMOTIVE FROM A UNIT (WITH THE USE OF A COUPLING ADAPTER):
- Brake the train set - Num 3 x 1sec.
- Uncouple the automatic coupler and the adapter - Delete
- Move off between 2 m and 25 m from the unit, and take the adapter off - Ctrl + Delete
In the current version of the MaSzyna Simulator, there are two methods of changing the consist in a given scenery or scenario:
- temporary - changed consists are remembered until the Starter.exe window is open;
- permanent - change of consist in scenarios source files;
Go to the site containing two methods of changing trains in the scenarios.
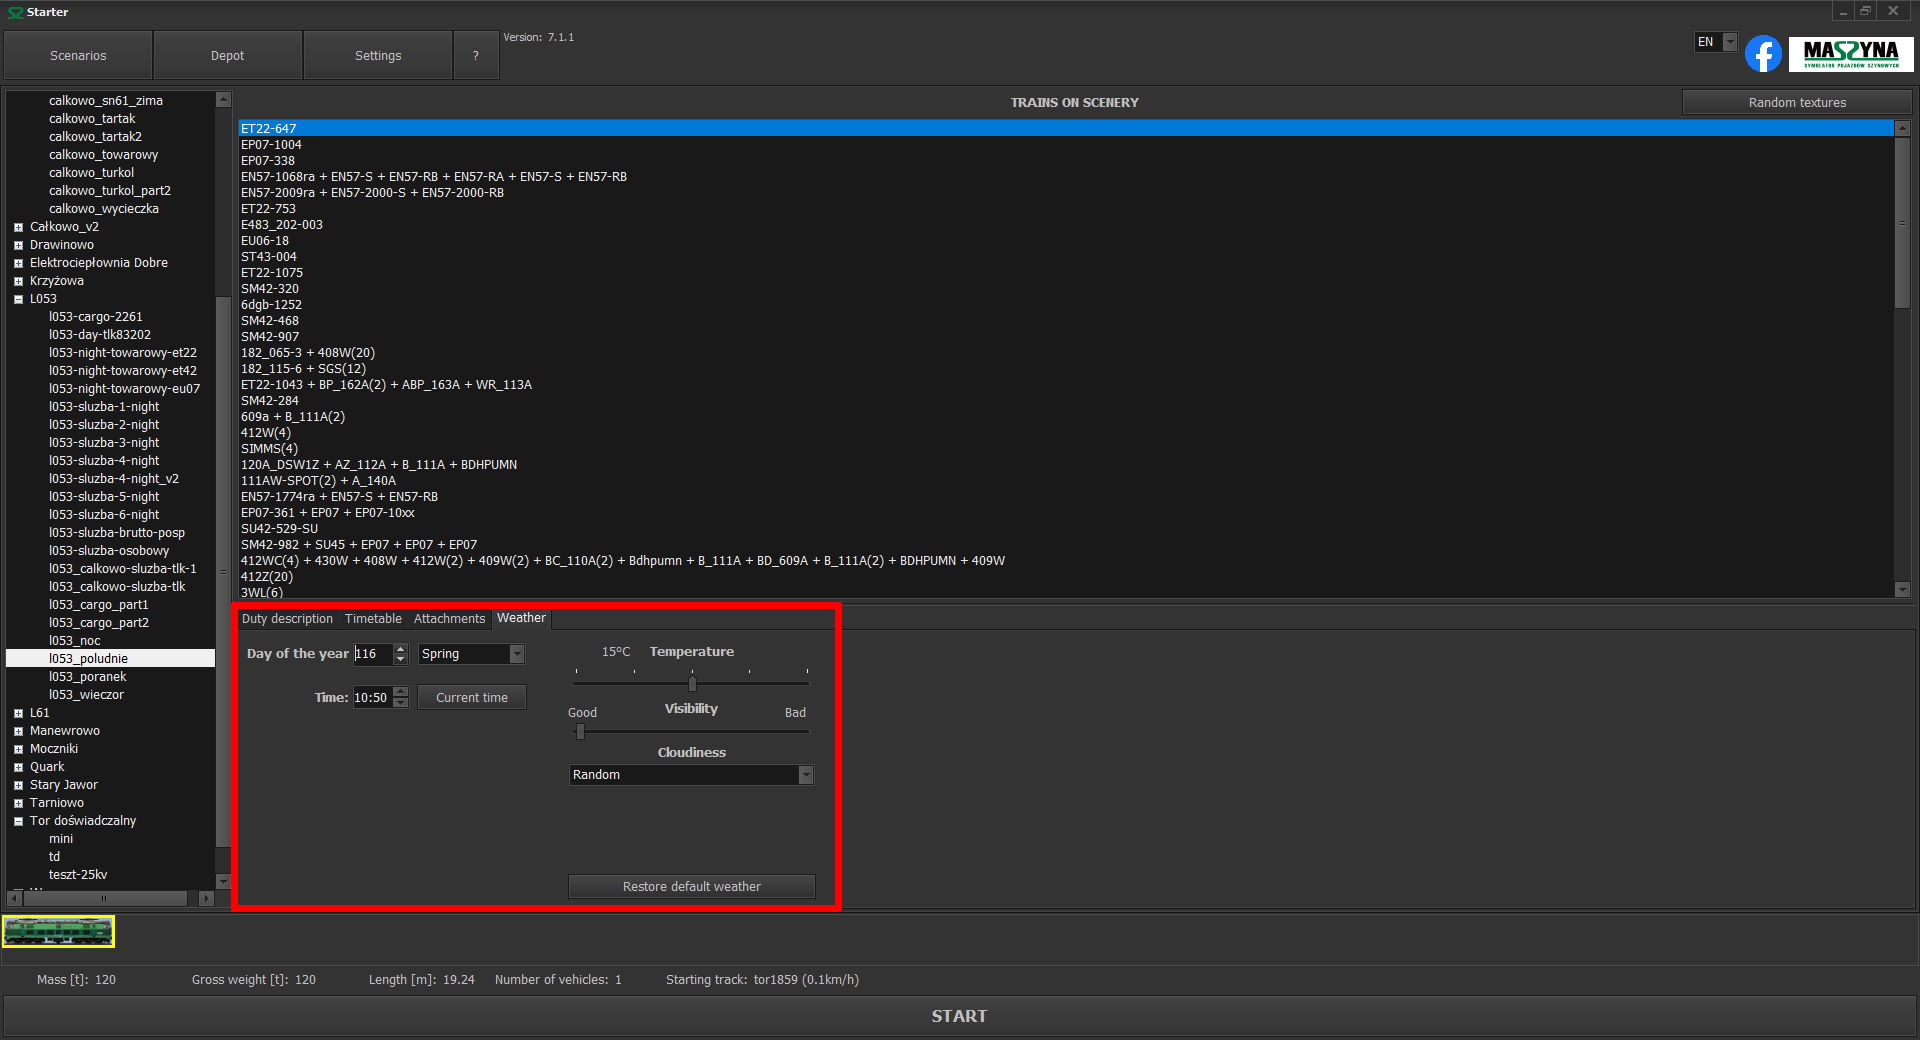
Changing the date, season, scenario start time, temperature, visibility and intensity of the rain is available in the Starter.exe application (the default program to run the MaSzyna Simulator).
All the options listed below are available in the Scenarios the main window in tab Weather.
In the screenshot below, the options for setting the weather that will be present during the simulation have been marked with a red frame.
We can change:
- Day of the year - in range: from 1 to 365 (setting the day affects the automatic change of the season);
- Season - in range: spring, summer, autumn, winter (setting the season affects automatic change the day to the first calendar day of the season);
- Hour - in range: from 00:00 to 23:59 (it is possible to set the current system time, then the timetable and the events in the scenario will be automatically modified in terms of time);
- Temperature - in range: from -15oC to 45oC;
- Visibillity - in range: from good to bad;
- Cloudiness - in range:
- random;
- cloudless;
- partly cloudy;
- cloudy;
- full;
- drizzle;
- shower;
Any changes made can be restored to the default values by pressing the button Restore default weather.
In the MaSzyna Simulator, the simulation date is set to the same as the system date of the simulation start - if we start MaSzyna on 1st January, winter weather will be simulated (i.e. a lot of snow), if we start on 1st July, summer weather will be simulated.
Important Notice
The date in the scenario, and thus the weather conditions, can be permanently set by the author through an entry movelight in the entry config in the given scenario file.
To change the weather during the simulation, turn on the panel Debug Data (F12), select a panel Scenario, and change the value slider: Fog distance, Cloud cover, Day of year.
To change the time during the simulation, turn on Debug Mode (Ctrl+Shift+F12), then the panel Debug Data (F12), select a panel Scenario, and change the value slider: Time of day.
Important Notice
Changing the time during the simulation will disrupt or completely prevent the correct execution of the scenario!
- You will need a minimum of 2 computers for this: The server and client - There can be many clients, but ony one server.
- It is recommended to use the strongest PC as the server!
- On all computers THE PHYSICS SETTINGS HAVE TO BE THE SAME but the graphical settings don't need to be the same.
- On the server: In the .ini file we add the following line: "network.server tcp 0.0.0.0:port", where "port" is a numerical value of the port, on which the server will communicate with the clients, for example 42424.
- On the server: we find out the IP address of the computer, external if playing over the internet, or local, if inside your local network.
- On the client(s): in the .ini file we add "network.client tcp X.Y.Z.W:port" where the "X.Y.Z.W" is the IP v4 address of the server (previous step) and the port it will communicate over.
Important note
Please note that OpenVR support in the MaSzyna is in the early phase of implementation.
For using of the VR mode in the MaSzyna, the following are required:
- Having controllers with a headset running on SteamVR.
- Having the following files in the main directory of the MaSzyna (not included in the main package of simulator by default):
- DLL
openvr_api:
- DLL
glfw3:
- Having in the main directory of the MaSzyna the VR mode folder with configuration files (Click to download the file):
- openvrconfig/bindings_knuckles.json
- openvrconfig/openvr_actions.json
- Addition following entries to the
eu07.ini configuration file:
vr.backend openvrvr.enabled yes
Important note
Currently, controllers support is in the preliminary stage. The elements in the cabin are activated with the indicator by selecting two available actions.
For the Index Knuckles controllers a mapping is included for the buttons A/B.
For other controllers, bind the actions (PrimaryAction and SecondaryAction) in the SteamVR menu.
Additional support the rest of the simulator functionality with the controllers will be added in the future.
You can read more about the OpenVR system in the MaSzyna Simulator and its feature updates at the forum [Polish Only] in a thread.
In order to understand why the packs don't contain all the add-ons published from the start of the existance of the Simulator, you need to know that for a couple of years, when it comes to add-on creation, there was simply only chaos. Add-ons often ware not tested before being published (there ware no standards, norms etc), which ment that they had errors, ware incomplete and often, ware incompatible with each other (often adding one scenery, broke all the remaining sceneries). Additionally, addons ware often hosted on external servers, which removed them after some time, which caused the forum to be full of dead links, instead of addons. Only at the end of 2008, thanks to Ra, it was possible to clean up the mess, through gathering everything in "Katalog dodatków" / Addon Catalogue , on the eu07.pl server. But to simply have all the addons in one place wasn't enough. The addon publication process was reorganised (from the end of 2008, every single addon, prior to publication, must be subject to mandatory tests). However, the incomplatability problem remained, since there was a lack of official and up-to-date package, which could create some sort of an reference point for the testers and creators (last, unofficial package was published half-way through 2006, however the last official, in 2004). That is why, at the beginning of 2009, a group was created, who spend a couple of months choosing, from previously published addons, the addons that ware worthy and didn't have too many mistakes, and then worked on the inter-compatability of these addons, by removing significant mistakes, filling in the missing files, etc. That is how Paczka Całościowa 2009, 2010, 2011 along with the Service Packs, MaSzyna 01.13, MaSzyna 08.13 and MaSzyna 15.04 ware created.
The newest Package is a continuation of that work, and just like the previous Packs, does not contain any low quality addons, or ones in Beta testing.
From the beginning of 2018, the publication method of the Pack was changed to a rolling release model, which means that newer versions, will not have release numbers.
The full list of changes in the simulator executable can be found on the GitHub repository.
Authors of the "MaSzyna" Simulator are creating this project as a part of their hobby, and pro-bono, sharing the time between family duties, work and the Simulator. That's why, when asked When is the new version/new add-ons coming out? we cannot give a clear answer. Information of the current work and future versions, will be presented on our Facebook, and the project's website. We can also reply to them by E-Mail, contact is given in the Official addresses and contact.
Simultaneusly, we need to add that the group of creators is not a closed group. Every willing and interested person can help in developing the project. There are so many fields, on which one can flourish. Contrary to popular opinion, to create this kind of a computer software, you don't need to be a computer science graduate.
For example, you simply need to have a digital camera to support the modellers with pictures of many different objects, which could me added to the sceneries. Those who don't have a camera, can record sounds of different equipment. In the project's lifetime, some people have been known to learn computer coding or using graphical modelling tools, and as such, to contribute significantly to the project's development.
We highly encourage you to register on the project's forum. It contains tips on creating models, textures, sceneries and many more. In case of problems, experienced users will help, sharing their knowledge and remarks. You can also become a Betatester, who's job it is to test and find mistakes in the new add-ons, support the creators with their help, and to create themselves.
All in all, we recomment you register on our forum, where you will find more information and tutorials. List of queries regarding helping in the development of the Simulator is in this forum thread [POLISH only].
See the page containing the Licence
In order to get to the answer, please press on the question.
- After I start a scenario, loading screen turns white/green, the Titlebar and the Task Manager both say "Application Not Responding". What do I do?
- How to move the loco?
- When I drive the train, a red flashing light lights up, a buzzer goes off, the train grinds to a halt, and I can't release the brakes. How do I fix this? What am I doing wrong?
- Are there any other cameras/views available?
- How do I couple and uncouple a loco to the carriages?
- How do I turn on the train radio?
- An error message appeared on the Koliber radio screen. How do I delete it?
- How to start one of the following traction vehicles: EN57AKŁ, EN57AL, EN71AKŚ, 21WE, 22WE, 34WE, 31WE, 36WEa, 45WE, ED78, E6ACT? Unable to perform startup.
- After leaving the vehicle, you cannot see the interior (it's empty).
- How to increase the window size, because the default resolution is too small for my screen?
- How do I switch the points? I heard that Shift + t/t works, but it doesn't!
- How to turn on the batteries?
- How do I change the train that I drive in this scenario?
- How do I turn on the gauge lights?
- Opening doors and windows in the cab?
- When trying to open the door/window in the cab, the loco makes quick, weird movements. How do I fix it?
- The CA (DSD) isn't working, and not canceling SHP (AWS) doesn't turn on the emergency brake. What's happening?
- Some time after turning on the Sim, the Y and / keys stop working. Help?
- The Sim freezes and I have low FPS. What do I do?
- How does one read the Hasler (speedometer) tape, from their drive in the MaSzyna?
- How to install new addons?
- I added a new vehicle, but I can't see it in the Starter, or on any of the routes.
- My laptop doesn't have a numeric keypad, so how do I drive a loco/unit?
- Does MaSzyna work on Linux, Mac OS etc?
- Are crashes and spectacular derailments possible in the Sim?
- I turned the autopilot on, but it doesn't work.
- Can you manually change the signal aspects?
- How do I take a screenshot?
- The cars/carriages keep braking!! I keep holding the Brake Release button, but it doesn't work.
- The brake handle, in the EN57 and other EMUs, automatically returns to the Driving position, after releasing the Num . (or Num 9) key.
- After entering the cab, I am far from the console/controls. How do I fix it?
- I press the M, but the Master Circuit Breaker doesn't set/enable.
- How do I stop the Simulation? I pressed Esc, but it does nothing.
- Can you save the simulation, before exiting the Sim?
- When will a new version, new addons come out?
- When I turn on the compressor, everything turns off, and nothing happens. How do I fix that?
- I can't "fill" the Main Pipe after braking CA/SHP turning on.
- A while after releasing the brakes, some pressure goes into the loco brake cylinders.
- When in motion, the loco suddenly turned off/"extinguishes".
- When starting off, the voltage suddenly drops to 0V.
- Small mouse movement causes rapid camera motion.
- The camera is spinning around it's own axis.
- I'm pressing Space to acknowledge the SHP signal, but it doesn't work!
- Translator's Note.
Answers:
-
You must wait patiently, since it doesn't necessarly mean that the Simulator is frozen. It just means that the scenery is being loaded, which may take long time, upto few minutes.
-
-
It's either the Czuwak Aktywny (CA) or SHP. The British equivalent of the "CA", is the Deadman's Switch or Driver Safety Device (DSD), and the English AWS would be similar in working to the Polish SHP. The first (CA), tests the driver's vigilance whilst driving every so often. The second (SHP), does the same as CA, however, in front of 'dangerous' places (signals etc). If you do not react to the visual and then audioble warnings, the emergency brake is activated. Each cab should have CA/SHP indicator lights, which in the required moments light up contionusly and then flash, usually red in color. Right thing to do, is to press the CA/SHP reset button. In MaSzyna, we use Spacebar for it. If you, however, don't, then you need to wait for the train to stop completly, press the CA/SHP reset button (Spacebar), and then unbrake the train.
-
Keys
Shift +
F4 switches between outside cameras. Firs is bound to top of first vehicle, second to top of the last one and third to bogie of the first one. You can exit the cab (by pressing
F4) and then you can "walk" over the whole scenery by using the Arrows. If you want to move faster, you can hold
Ctrl while operating the arrow, if slower; hold
Shift. You can also combine both the keys (Ctrl + Shift) to move really quickly. To move up or down, use the
Page Up (go up) or
Page Down (go down) keys.
In the Free Fly Mode (
F4 button), it is possible to define up to 10 custom camera positions and to switch between them. It is done by using the top row number keys (NOT the keypad keys). More Information:
MaSzyna Readme file, "Keyboard Controls" section.
-
-
The train radio is available in some scenarios. It is activated by a key combination Ctrl + R, but requires to set up proper radio channel according to timetable and scenerio description. Most cabs have radios that can be operated with mouse. In the rest all functions are aviable from keyboard, as described in the "Key functions" page.
-
To clear the error displayed on the Koliber radio screen, you should reset the traction vehicle. This can be done by turning the battery off j and next turning on j.
-
How to start one of the following traction vehicles: EN57AKŁ, EN57AL, EN71AKŚ, 21WE, 22WE, 34WE, 31WE, 36WEa, 45WE, ED78, E6ACT? Unable to perform startup.
In version 22.08, the cab activation function was introduced for the following traction vehicles: EN57AKŁ, EN57AL, EN71AKŚ, 21WE, 22WE, 34WE, 31WE, 36WEa, 45WE, ED78, E6ACT. Activation is possible only by clicking by the mouse on a dedicated switch in the cabin of a given traction vehicle.
-
The scenery editor (F11) has been launched. To leave the cab, use the F4 key.
-
In the Starter.exe, go to the tab Graphics in window Settings. In menu Resolution select the desired screen resolution. You can select the full screen mode in the tab Main in window Settings.
-
There is no need for manual point switching, everything is done automatically, with the help of 'events' created by the scenario's author. The only scenery where manual points switching is required (and possible), is 'Manewrowo3'. In order to switch the points, we move over the point's lever (similarly like when coupling and uncoupling locos, we literaly have to 'enter' the lever) and press Shift + t (for going to the side) or t (for going straight). We should see the handle move, along with the point blades.
-
Turning on the batteries is simulated in a simplified method than in reality. To turn on the batteries, press the J key, which causes the CA/SHP system to activate, and has to be reset using the CA/SHP reset button - SPACE. ATTENTION! You need to select a direction on the reverser (use either the D or the R keys) in order to reset the CA/SHP.
-
-
-
The light beams are only visible when the heaformps are turned on and during the night time.
-
-
-
In Starter.exe in window Settings in tab Main uncheck Debugmode.
-
In Starter.exe in window Settings in tab Main uncheck Debugmode.
-
Press Ctrl + Shift.
In order to prevent such problems in the future, you can disable the keyboard shortcuts that change the keyboard layouts in your Operating System
-
In
Starter.exe in window
Settings in tab
Sound | Physic uncheck:
- full physics;
- save physics log;
- save log;
In window
Settings in tab
Graphic limit graphic settings. Have a look in the EU07.ini file, located in the main MaSzyna folder. You will find there many options, not supported by the Starter.exe. You could also set the graphics mode to performance. You might also want to experiment with different grpahics drivers. In the case of fairly newer cards, it is recommended to use the newest drivers. However if you have an older card, then older drivers might be a better option. If you have an old comupter, then try to turn off all the software running in the background, like any IM, browsers, anti-virus software, music players, etc), since they will only unnecessarly lower the performance of the PC. Sadly, those changes will not cause a miracle rise in FPS, especially if you have an integrated GPU.
-
In Starter.exe in window Settings in tab Sound | Physic enable Save physics log option. For every vehicle in teh scenario, a [vehicle name].dat files will be generated, in the physicslog folder. in order to open such file, use the htv.exe, which is located in the programy_na_potrzeby_symulatora folder, and in the odczyt_tasm_z_predkosciomierza subfolder.
-
In most cases there is no need - Newest versions of MaSzyna will contain all the newly published addons.
In extreme cases, like testing of addons from the TD department, you will need to extract the contents of the archive into the main MaSzyna folder, in such a way that the folders from the archive match up with the folders from MaSzyna. You also need to follow all the instructions and informations given in the information file(s) inside of the archive. You will most likely need to translate them from Polish - www.deepl.com or www.translate.google.com
-
-
In Starter.exe in window Settings click on Keyboard setting. In this window, we can assign keys to given functions. Keys can also be remapped in the file eu07_input-keyboard.ini
-
Yes, by using an Windows emulator, like Wine. For a while now, there is also a Linux native binary file. Instructions on the last pages of the following
forum thread (Polish). Future releases will make running and installing MaSzyna easier on non-Windows systems.
-
No.
-
Autopilot means the computer takes over the driving of the train. Saddly, not all sceneries are fully compatible with Autopilot driven trains, meaning it won't be able to drive everywhere correctly.
-
No, the signals are pre-set for each scenario.
-
To take a screenshot, use the PrtScr key. The image will be saved in the screenshots directory (main directory of the simulator). It is also possible to make a screenshot using Win + PrtScr (only in Windows 10 and 11 - by default, it saves the screenshots in the user's My images.
-
Current addons are presented on the
www.eu07.pl/pobierz website. Only there are all addons pre-tested and guaranteed to work correctly.
-
If you hold the brake handle for too long in the Quick Release position, it might happen that, the train will not release the brakes when you put the handle in the Running position. It is so called 'Brake Overcharge'. You need to apply Full Service braking, pressing Num 5, exit the cab, fly over the whole train, and press Num 6(Brake Release) over every carriage/car. For future reference, do not hold the Brake handle in the Quick Release position for longer than couple of seconds. If your train has the following carriage types; Bdhpumn, WLABd & Z1 , then avoid using Quick Release if possible. Passenger trains generally don't need you to use it.
In case of long freight trains you can (and sometimes have to) use it "'till it stops" (untill the pressure stabilises itself at 5,4 bar), however the moment that happens you need to put it in the Running position.